KM Editor Tutorial
The KM (Knowledge Model) Editor is used for creating and updating knowledge models. This tutorial will go through the steps of creating a new KM from scratch.
Click on “KM Editor” in the left-hand menu of the wizard
Click “Create” on the top to the right
Fill the fields with appropriate Name (e.g. ‘KM Editor Test Model’) and Knowledge Model ID (e.g. ‘test-model’). The ID can contain alphanumeric characters and dash but cannot start or end with dash. Leave Parent Knowledge model as is (–). Note: If you want to update or reuse an existing model, this is where you select which one.
Click on “Save” button
Create a chapter
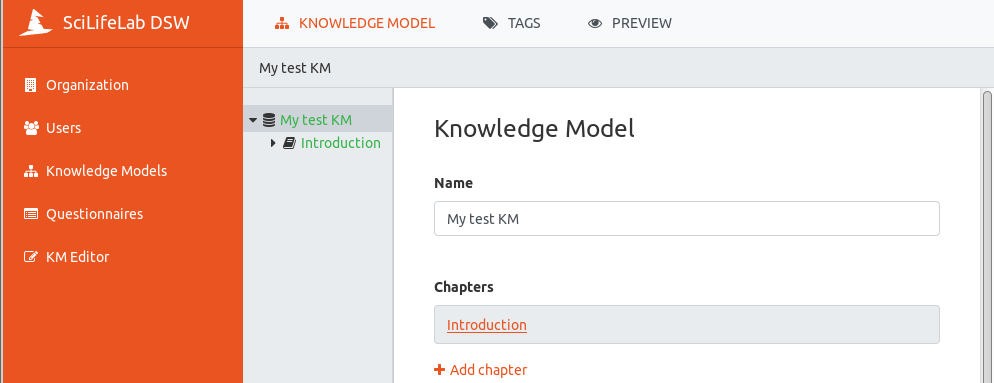
Once you have created a new KM, it’s time to fill it with chapters (i.e. sections; think of them as headers of your model).
Write a name of the KM (e.g. ‘My test KM’)
Press + Add chapter
Write a Title (e.g. ‘Introduction’) and Text (e.g. ‘Background information’) for the chapter. Note: The Text field is where you add a description of what the chapter will contain questions about. There are two tabs, ‘Editor’ and ‘Preview’, since you can use Markdown (https://www.markdownguide.org/basic-syntax/) to format the text and check the result in ‘Preview’.
Press +Add question in order to create a question
Notice the grey area which gives an overview of your KM. Use this to navigate between the different parts. Whenever you want to see the result of an addition, click on another part in the KM overview (at this stage this would be the “parent” we named ‘My test KM’.
Add a question
Questions can be of different types:
Options
List of items
Value
Let’s create some questions of each type to demonstrate:
- Value
Select Value as Question Type
Write ‘Project title’ in the Title field
In the Text field, write ‘Please enter the title of your project’, as instructive text
Use When does this question become desirable? to indicate in which phase of the project a question should be answered, e.g. Before submitting the proposal.
Value type can be String, Date, Number or Text, select Text
- List of items
Click on Introduction in the grey overview area of the editor
Press +Add question in order to create a new question
Select List of items as Question Type
Write ‘Project members’ as Title
Write ‘Please specify the researchers participating in the project’ as Text
Select Before submitting the DMP as When does this question become desirable?
In the Item Template, click on +Add question
Set the Question type to Value
Write ‘Name’ as Title
Back to one level up by clicking on Project members in the grey overview part of the editor
Scroll down and click on +Add question in the Item Template
Set the Question type to Value
Write ‘Email’ as Title
- Options
Click on Introduction in the grey overview area of the editor
Press +Add question in order to create a new question
Select Options as Question Type
Write ‘Research field’ as Title
Write ‘Please select the research field for this project’ as Text
Click on +Add answer
Write ‘Life science’ as Label
Write ‘Your project is likely going to produce a lot of data, a full data management plan will prepare you for the various challenges this will entail’ as Advice
Click on Research field in the grey overview area, scroll down to Answers and click on +Add answer
Write ‘Other’ as Label
Scroll down to Follow-up Questions and click on +Add follow-upp question
Select Value as Question Type
Write ‘Which other research field?’ as Title
As Value Type, select Text
Save
Whenever there are changes not saved in the KM, the clickable options “Discard” and “Save” is visible in the top row of the wizard. Click on “Save”.
Notice that this automatically lead you to the top level of the KM Editor, outside your KM. If you position the mouse on your KM (‘Test of KM Editor’) you see the options of Open Editor, Publish and Delete. Click on Open Editor in order to continue editing the KM.
Add Reference and Expert
All question types have the possibility of adding references and experts, to be used for adding additional information and people to contact in order to get help, respectively. Let’s add one of each:
Click on the arrow at Research field in the grey overview area, and scroll down to References
Click on +Add reference
Write ‘https://en.wikipedia.org/wiki/List_of_life_sciences’ as URL
Write ‘List of Life sciences’ as Label
Click on Research field again and then click on +Add reference
Write ‘My science for life guru’ as Name
Write ‘help@scilifeguru.com’ as (the fake) Email
Click on “Save” in top right corner, position the mouse on your KM (‘Test of KM Editor’), and click on Open Editor
Change order of questions
It is possible to rearrange the order of questions, if they are on the same ‘level’ (but not between levels at the moment of writing this tutorial). Let’s try:
Click on Introduction and scroll down to Questions. The three questions created are all on the same level.
Position the mouse on the grey area next to Research field, hold down the left button of the mouse and drag-and-drop above Project title
If and when the need arise to move a question to another level/group of questions, there are currently two alternatives:
Rewrite the question in the new position, or
Export the knowledge model and edit the resulting json file in an appropriate editor, and then import it again
Preview
In order to see what the resulting questionnaire will look like, you can click on “PREVIEW” on top row of the wizard. When you are finished just klick on KNOWLEDGE MODEL on the rop row, to return to editing mode.
Tags
Also on the top row of the wizard, is the “TAGS” viewer function. Tags can be used to mark questions of interest to certain stakeholders, when only a subset of the questions are of interest. We have not defined any tags yet, so let’s do that:
Click on ‘My test KM’ in the grey overview area, and scroll down to Tags
Click on + Add tag
Write ‘Library’ as Name
Pick a color by clicking on one of the colored squares
Expand Introduction and click on Project title in the grey overview area
Scroll down to Tags and mark this question as of interest to the library by clicking the check box
Do the same for Research field
Click on “PREVIEW” and notice that all questions are visible. Select the Library tag, by clicking in it’s check box. Now only the two questions Project title and Research field are visible.
Publish
When you are happy with the content and look of your KM, it is time to make it available for people to use it (either as a start for their own KM or for users to fill it out in form of so called Questionnaires):
Click on “KM Editor” in the leftside menu
Position the mouse on your KM (‘Test of KM Editor’) and click on Publish among the alternatives that becomes visible
Add a version number in New version (e.g. ‘1.0.0’)
Write a Description (e.g. ‘This is the root version’)
Click on “Publish”
Export
A knowledge model kan be exported into a json formatted file:
Click on “Knowledge Models” in the left hand menu
Position your mouse on the KM (‘Test of KM Editor’) and click on View detail
Click on Export and save the file on your computer.
Import
A knowledge model can also be imported:
Click on “Knowledge Models” in the left hand menu
Click on “Import” in top-right corner
Click on “Choose file”, select the .km-file
Click on “Upload”
Note: If the KM already exists in the wizard it needs to be deleted first, both in the “KM Editor” (first) and in “Knowledge Models”